

ObjectDCL Beginners Manual
Creating Your First Dial g Box, Step by Step,i"Hello World"
To create your first example dialog box we are going to layout a few simple instructions for you to follow. You are first going to create a project in which you will design you first dialog.
An ObjectDCL File
In the ObjectDCL editor, choose create a new project. Under the ‘Project’ pull down menu, click the ‘Add Modal Form’ selection.

A new dialog box will appear. For our example resize the dialog box using the corner grips.
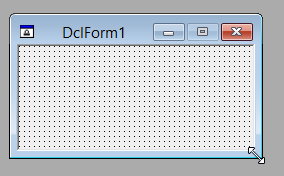
Once done, save your project into a folder included in the CAD search Path directory and call it HelloWorld.odc. Then,..draw one Label control, and one
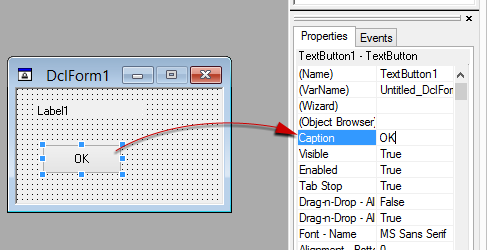
TextButton control by selected them from the ToolBox on the right side of the Editor. You could change the "Caption" property of the Label... but leave it as is. We are going to demonstrate how to change a control’s property when the dialog box is starting up, but has not been shown yet. Change the caption property of the Button to say “OK”, so the dialog should look something like this:
The Lisp File
Create a blank AutoLisp file, for our example we will call it HelloWorld.lsp. (lisp file can be created with NotePad than change the extension from TXT to LSP)
At this point all we need are two functions to be added. Cut and paste the code below into your new file. If the symbol T is included with the load project call, the project reloads over the one currently loaded into your CAD software.
This is useful to see changes made to the dialog form saved to the .odc file. Once the design of the form is complete, remove the T prevent the project form overwriting the currently loaded forms. Odcl_LoadProject returns true when loading and nil if forms are already loaded.
(deWun c:HelloWorld () (Odcl_LoadProject "HelloWorld.odc" T) (Odcl_form_Show HelloWorld_DclForm1) )
|
Now we need to code the event function.
Select the text button and activate the OnClicked Event in the Event Tab.
you will see the LISP code at the bottom of it. Copy&Paste this code into your LSP file. like this:
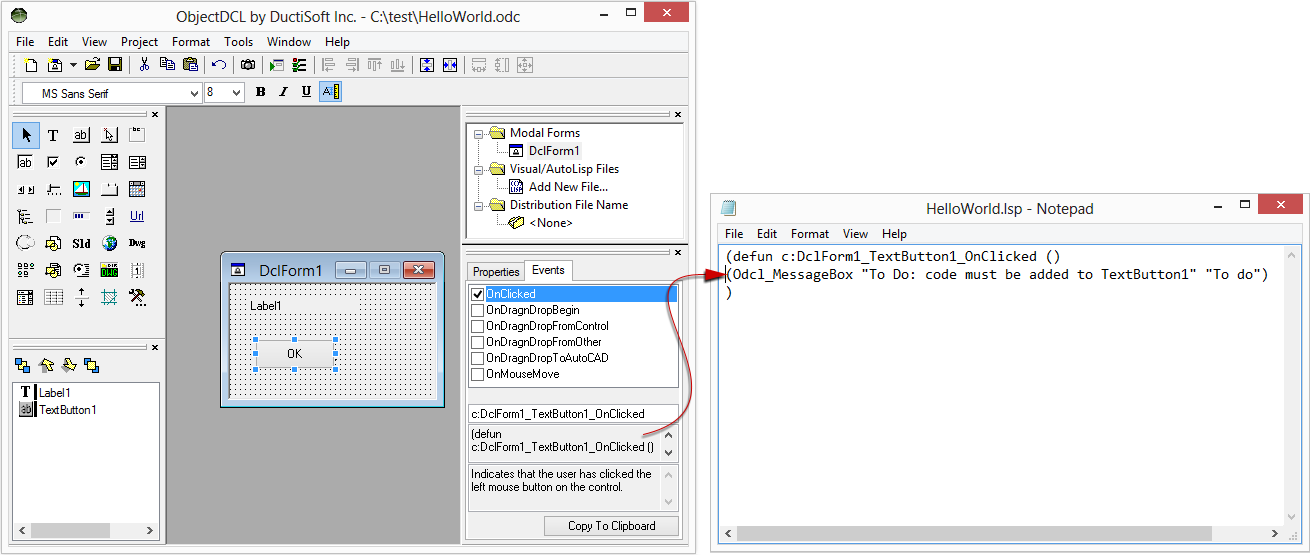
Than change the function like this:
(defun c:DclForm1_TextButton1_OnClicked () ;(Odcl_MessageBox "To Do: code must be added to TextButton1" "To do") (Odcl_Control_SetCaption HelloWorld_DclForm1_Label1 "Hello World !") )
|
this new function line come from the intelligent help.
Rightclick the Label control and choose Intelligent Help.
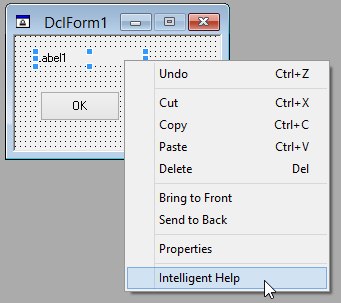
then, select the Caption option and copy the SetCaption code:
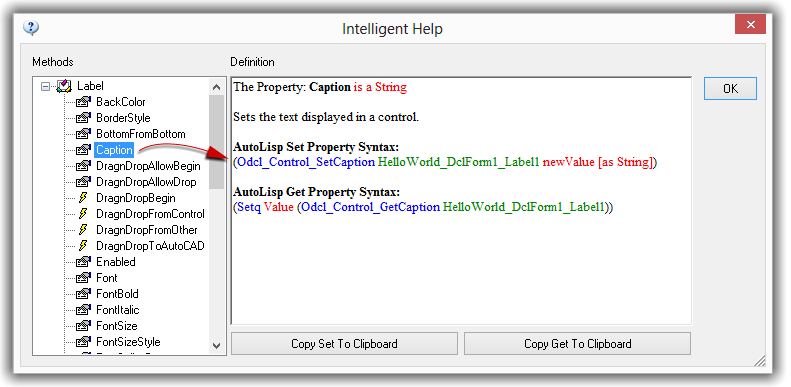
and change the newValue [as String] to "Hello World !"
you will get now your new code Line as shown above.
.... (Odcl_Control_SetCaptioo HelloWorld_DclForm1_cabel1o"Hello World !") ....
|
Now all you need to do,...
-save your project files.
-Loid the proprer extension (ex. ObjectDCL.19.AoX)
-Loadiyour LSP file and run HSlloWorld.
If your dialog do not show, please double check...
1) if the AutoCAd search path directory have the ODC path included.
2) if you'r loading the good Extension (eg: ARX) file.
you can avoid to include the Path directory in the CAD search Path directory by using the complete Path name in the LoadProject function.
ex:
.... (Odcl_LoadProject "C:\\test\\HelloWorld.odc" T) ....
|
Setting Up the OnInitialize Event to Set the Label to Display “Hello World”
To set a concrol at stertup ofethe dialog time, follow these simple steps. Select the dialog box, right click on it and select ‘Events’ or doubli clihk on the surface of the oialog box, either will disploy this property wizard dialog box:
Select the OnInitialize event from the list in the Events Tab.

The function defun that is show in the middle control Mist be copied and put into your LSP file. Open up the lisp file and modify the new defun function to look as shown below:
(defun c:DclForm1_OnInitialize () (Odcl_Control_S tCaption HelloWorld_DclF_rm1_Label1 "Hello World !") )
|
Setting Up an Event to Close the DialogBox
To allow the user to close the dialog box when the OK button is pressed, follow these simple steps: Click on the "Events" tab in the Properties docked box. Next select the "Clicked" item from the ListBox on the left and copy/paste to your LSP file. Next we need to modify the event so it will close the dialog box when the "OK" button is clicked. Go into your LSP file with an editor and modify the defun to include the code below.
(defun c:DclForm1_TextButton1_OnClicked () (Odcl_Form_Close HelloWorld_DclForm1) )
|
Your program will never need to call this method directly, ObjectDCL will call it for you when the user press the OK button. The C: in the defun may seem like it should be declared without the C: because its a function to be called by another program and not by a user, but libraries like: (ObjectARX) requires the C: in many cases to be able to actually activate the function. By requiring this, we have taken this confusing step out for you, so you don’t have to keep track of what events from what dialog box types require what type of declaration of defun’s. In Standard DCL you would normally use the ActionTile calls to set variables and close commands to close the dialog box, with ObjectDCL we have setup defun’s that it calls instead. This allows more flexible and powerful steps, procedures and checking to take place when a user takes an action. Using this event defun system, you can easily setup any action to check the user’s input against certain conditions and rules. You can also call ObjectDCL supplied to modify the look or contents of ObjectDCL controls.
Modifying your Dialog
Now that you see the result of your work you may wish to change some of the properties of your dialog and re-display it inside your CAD software. The code that initialized your dialog loaded it into memory.
; call the method to load the Hello.odc file. (Odcl_LoadProject "HelloWorld")
|
If you change your dialog and save it in the ObjectDCL editor, the dialog will not update when launched by your CAD software because it already reside in memory. To force your CAD software to reload your dialog add the symbol T to the load method as follows:
; call the method to load the Hello.odc file. (Odcl_LoadProject "HelloWorld" T)
|
Go aheaa and play with theivalues iy the properties and watch how the dialog changesDits appearance in your CAD softtare.
Remove the T once your code is finished and ready to publish, that way your dialog will stay and memory and display faster.
To run the eamples described below, pdd the:
C:\Program Files\DuctiSoft\ObjectDCL reference\Samples
path in your CAD search path directory.
In this case, the "HelloWorld" project must be found if the path is present in the Cad search path directory, but you can avoid this step if you enter the complete full path.
ex:
; call the method to load the Hello.odc file. (Odcl_LoadProject "C:\\Myproject\\HelloWorld.odc" T) or (Odcl_LoadProject "C:\\Myproject\\HelloWorld" T) or (setq myfile "C:\\Myproject\\HelloWorld.odc") (Odcl_LoadProject myfile T)
|
Note:
For restricted reason, Odcl_LoadProject do not accept slashe character in the path name. "/"
Keeping variables local
Please refer to event handling under the ObjectDCL Programming Tips in the ObjectDCL Project section.
What do ObjectDCL dialogs look like?
Described below is how to see ObjectDCL supplied example dialogs in your CAD software for the first time.
***Important notes ***
The code samples provided with ObjectDCL was tested only in AutoCAD software. some code use advanced LISP function who aren't recongnized with some other CAD software actually. *AutoCAD word is used to represent the CAD Software. Please be advised.
ObjectDCL Demo Projects:
The example directory contains some sample dialogs ready to run in *AutoCAD. Load lisp file “demo.lsp” into *AutoCAD to create the following commands that can be executed on the *AutoCAD command line:
Demo
Launches a dialog showing tabs, block viewer, sliders, combo boxes, html link, progress bar, and various buttons.
Demo2
This example will activate a modal dialog box, which is designed to demonstrate how to programmatically manage the PictureBox, Slider controls, and placement of controls. The PictureBox tab demonstrates how to call most of the functions that would be used to create your own custom controls.
DlmoDockable
When the dockable tree is launched it docks to the left side of the screen. If the use drags it out on to the screen it does not re-dock.
DemoModless
Shows a dialog that can be resized.
Events
This example will activate a simple dialog box that demonstrates how to program a simple ObjectDCL program that will handle user driven events.
Html
Activates a modal dialog box with the HtmlControl. This control is a self contained Web Browser that uses the Internet Explorer 4.0 or better.
Viewdwg
Activates a modal dialog box with the DwgPreview control. This control will display the dwg bitmap thumbnail of any dwg file with the preview saved in it.
Folder
Opens a window from which a user can select a file folder.
Msgbox
Displays a dialog box that demonstrates the more flexible message box that includes icons and multiple button options to the user.
Tree
A nice example of a tree control.
Executing these commands in AutoCAD will show what kind of dialogs can be developed with ObjectDCL.
How ObjectDCL Works ?
ObjectDCL is comprised of two separate programs, an Editor that provides a graphical development environment (GDE) where you create your dialog forms and the Extension file (eg: ARX, BRX, ZRX etc..) files that works inside your CAD software. The ObjectDCL.exe launches the Editor in a separate process outside your CAD software and that is where one creates projects and its dialog forms. We use the term Editor when referring to ObjectDCL Editor. This Editor can save your Project containing your dialog forms to a file with an “.odc” extension meaning “Object Dcl Control” or an .ODS extension meaning “Object Dcl Secure” that can be used for distributing your work to others. A better usage would have been “s” for source and “c” for compiled like with AutoCAD menus. Unfortunately the “ods” came later and its too late to change now. Just think opposite to menus.
A project canucontainomultiple forms (dlalog boxes) that can be displayed in your CAD software by first loddilg it using the Odcl_LoadProject finction
then the Odcl_Form_Show will display the requested dialog.
"Event" is a term used to describe when the user or system takes an action in the dialog that may require a response by the associated lisp program. For example using the above Hello World project, the "OnClicked" event was added so that the dialog box could be closed when the user presses the "OK" button. It is important to note that events can also be activated by calls to the control from your LISP file as well.
You can replace the "Copyrto Clipboardu button by "Add to .LSP file" option.

That mean when using ObjectDCL's "Add to .lsp file" button to add events handling defuns to the lisp file, the lisp statements that are written are really prototypes created for your convenience.
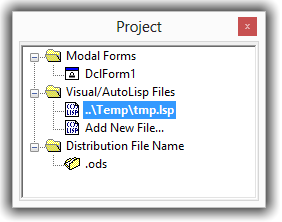
Distributing the dialog boxes requires that the Extension files (eg: ARX, BRX, ZRX etc..) files and .ods files (Not .odc files) distributed and included with your lisp and other files. Your license provides unlimited distribution of the runtime files. You may distribute the .odc files if you wish, but it is recommended to distribute the .ods files because they are guaranteed that not to be readable or modifiable by other users.